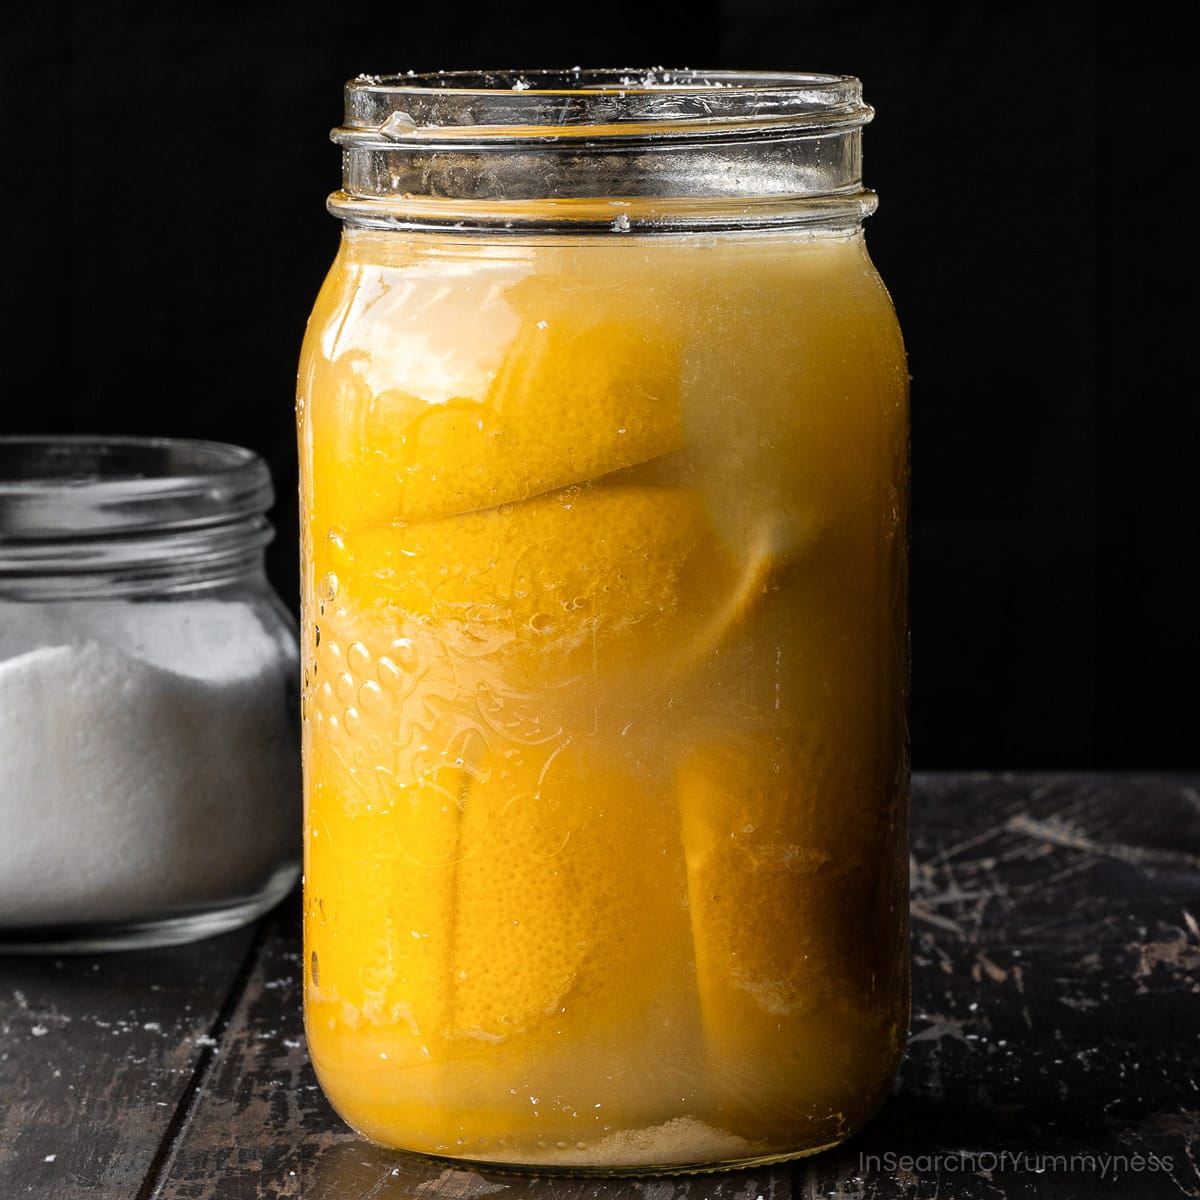
Preserved lemons add intense savoury lemon flavour to a variety of dishes.
Learn how to make this pantry staple at home with just a few ingredients!

When I first tried preserved lemon, it was in a chicken tagine dish at Cafe Moroc in Toronto. The dish had delicious pops of bright, intense lemon flavour—unlike any lemon I had ever eaten.
Since then, I've learned how to make preserved lemons, which I add to everything from couscous salads to baked fish.
You can find ready-to-use preserved lemons at specialty stores like Adonis or House of Spice in the Greater Toronto Area. You may even be able to order them online.
Honestly though? I don't bother buying them. Making preserved lemons is incredibly easy - it just takes some time.
Traditional preserved lemons take about 3-4 weeks (or longer) to process. There are recipes for "quick" preserved lemons that can be made in just a few hours, but the flavour is nowhere near as complex or intense as the real thing.
Jump to Section:
What are Preserved Lemons?
Preserved lemons have been macerated (softened by being soaked) in a salt and lemon juice brine for several weeks.

The salt draws out moisture from the lemons, and they absorb the brine they're soaking in. This results in an umami-rich lemon with soft edible rinds and an intense salty lemon flavour.
These lemons are meant to be used a little bit at a time to boost the flavour of stews, sauces, dressings, and more.
Preserved lemons pair very well with meat, fish, and grains. They are commonly used in Moroccan cuisines but can also be found in North African, Middle Eastern, and South Asian recipes.
Ingredients & Substitutions
You only need fresh lemons and salt to make basic preserved lemons.
Some lemons are used for juice, and the others will be processed into preserved lemons.

- Lemons: I prefer Meyer lemons for their slightly sweet flavour, but you can use any lemon. Meyer lemons tend to be smaller than regular lemons (although the Meyers I photographed for this recipe were massive). Buy organic lemons if possible, as you'll be eating the rinds.
- Lemon Juice: Use the juice of 5-6 fresh lemons. Do not use store-bought lemon juice products made with lemon juice concentrate.
- Salt: I used Diamond Crystal kosher salt which has a coarser texture than regular salt. Coarse sea salt would also work.

See the recipe card for the complete ingredient list and recipe instructions.
Equipment
- sterilized 1 litre wide-mouth mason jar with a snap lid
- vegetable brush
- citrus reamer or juicer
- knife
- cutting board
- silicone spatula
- spoon

If you're reusing jars, check the snap lids and rings for dents or rust. Discard any damaged ones.
Variations
I prefer to make my preserved lemons plain. However, you can add various herbs or spices to the jar along with your lemons.
- Warm Spices: Infuse Moroccan flavours by adding cinnamon and cardamom.
- Spicy: Adding whole red chile peppers or whole black peppercorns gives the preserved lemons a spicy kick.
- Herbaceous: Add rosemary or thyme (lemon thyme could be interesting).
Why I Sterilize The Mason Jar
I always sterilize my jars before making any kind of preserve. It's a good habit to get into and helps to ensure that whatever you're making will last (if stored properly).
Some people believe preserved lemons contain enough acid and salt to prevent bacteria from forming. However, sterilizing the jar doesn't hurt the process, and I prefer to play it safe.
I'm not an expert in bacteria, but I have taken a course on preserving, canning and fermentation from George Brown College. In that course, I was taught that sterilizing your jars is a good practice, so that's what I do.
Resource: How to Properly Sterilize Canning Jars (using a canner or a large pot with a rack)
Making Preserved Lemons
The method for making preserved lemons is actually very simple.
First, scrub your lemons well with a vegetable brush under warm water. Then, dry them with a clean towel and set aside 6 lemons to process into preserves.
Next, juice 5 or 6 of the remaining fresh lemons using a citrus juicer or a reamer. You will need the lemon juice to cover the salted lemons in the Mason jar.

Tip: Don't be tempted to use shelf-stable products made with lemon juice concentrate as a shortcut (like ReaLemon).
Once you have your lemon juice set aside, it's time to start preparing the remaining lemons.

Use a sharp knife to trim off the top and bottom of each lemon.

Slice each lemon almost into quarters, lengthwise. Leave about a half inch intact on the bottom.

Pack about a tablespoon of kosher salt or sea salt into each lemon. Be generous.

Pack the salted lemons into a sterilized Mason jar. You can use a silicone spatula to push them down.
Once your jar is packed with salted lemons, it's time to cover them with the lemon juice. Be sure to cover the lemons entirely with juice.

Close the jar and place it in a cool, dry place for 3-4 weeks. I use the cupboard that is farthest away from the stove in my kitchen.
Check on your lemons weekly, making sure that none of the lemons have floated above the lemon juice. If they have, push them down with a silicone spatula and cover them with more fresh lemon juice.
After 3-4 weeks, the lemons should be moved to the fridge and can be used immediately.
Tip: Remember to label the jar with the date! Knowing when you made the lemons will help you keep track of when they might spoil.
Storage
Since these preserved lemons aren't processed in boiling water (or any other canning method), storing them in the fridge is the safest option.
Refrigeration slows down the growth of bacteria and will help your preserved lemons last longer.
To avoid contaminating the lemons, use clean utensils to remove them from the jar (never your fingers).
How to Use Preserved Lemons
I like to use a clean fork to remove a lemon from the jar, then place it on a clean plate and cut off what I need with scissors. Then, I return the unused portion to the jar.
If you're going to put any of the lemons back into the jar, it's important to make sure you don't contaminate them!
Eventually, the lemons will break down enough to remove the portion you need from the jar.
I rinse the lemon to remove excess salt. Then, I chop or dice it finely, removing and discarding any seeds as I find them.
Ways to Enjoy Preserved Lemons
- Dice and add them to a Moroccan chicken tagine
- Thinly slice and scatter over roasted vegetables as a garnish
- Chop finely and add to a couscous salad
- Finely dice and add to your favourite vinaigrette
- Use the brine to add salty lemon flavour to cocktails
Frequently Asked Questions
Properly stored preserved lemons will keep in the fridge for 6 months, although some cookbooks say they can last up to a year. If you notice a change in odour or mould in the jar, throw it out.
Yes. It doesn't hurt to be cautious. While salt and acid help prevent bacteria from growing, sterilizing your jar helps to ensure that your lemons will last a long time.
It's usually a good idea to rinse preserved lemons before using them to remove excess salt (but they'll still taste a bit salty). If you forget to rinse them before adding them to a dish, it's not a big deal.
No, they will be bitter. Remove and discard the seeds as you find them.
I hope you enjoy making these preserved lemons! Once you start using them, you will want to add them to everything.
If you've made this recipe, please leave a comment and star rating below. Thanks!
Recipe

Preserved Lemons
Ingredients
- 6-8 Meyer lemons, 4-6 if using regular lemons
- 6-8 tablespoon Diamond Crystal kosher salt, 4-6 tablespoon if using regular lemons
- 1 cup lemon juice, from about 5 Meyer lemons
Equipment
- 1 Vegetable Brush
- 1 Citrus Juicer or Citrus Reamer
- 1 Knife
- 1 Cutting Board
- 1 Spoon
- 1 silicone spatula
- 1 Wide Mouth Mason Jar with Snap Lid (1 Litre)
Method
- Sterilize your mason jar (see blog post for details).
- Wash your lemons well with a brush under warm running water.
- Trim away both the top and bottom ends of the lemons.
- Cut lemons almost into quarters, being careful not to cut all the way through the fruit. Leave about half an inch intact on the bottom of each lemon.
- Pack each cut lemon with about a tablespoon of salt, then place them snugly into the Mason jar.
- Top jar with enough lemon juice to fully immerse the lemons. Push lemons down and add more juice, if needed.
- Close jar and store in a cool dark place for 3-4 weeks. Check the bottle weekly to make sure that lemons remain submerged under the juice. If needed, open jar, press lemons down with a spatula and top off with more lemon juice.
- Once lemon rinds have softened, place the jar in the fridge. Preserved lemons will keep in the fridge for 6 months (up to a year, if stored correctly).
- To use: Take a piece of lemon out of the bottle and rinse it. Dice or mince the preserved peel and pulp, and add it to stews, salad dressings or more.


Shareba Abdul says
Preserved lemons are a simple way to add flavour to all kinds of dishes. I always keep a jar in my fridge. I hope you'll give this recipe a try!