

If you love homemade pumpkin pie but don't enjoy making pastry from scratch, this pumpkin pie with a graham cracker crust is for you!
This easy pumpkin pie recipe has a simple 3-ingredient crust that gets stirred together, no rolling pin required!
This pie is a lovely dessert recipe for Thanksgiving or just a special fall treat.

Save This Recipe
Recipe Highlights
- Servings: Makes one 9-inch pie (8 slices)
- Time Commitment: 15 minutes prep + 45-55 minutes baking
- Effort Required: Very easy! Mix, press, pour, and bake.
- Special Equipment: 9-inch pie plate (ceramic or glass)
- Dietary Notes: Contains dairy and eggs.
Jump to:

Ingredients & Substitutions
This recipe uses simple ingredients you likely have on hand. I used heavy cream for an extra-rich filling, but evaporated milk works too.
Also, you could add a pinch of ground cinnamon or ground ginger to the crust, but I kept mine plain.

- Butter: Use salted butter, or unsalted + a pinch of salt.
- Cream: Heavy or whipping cream works best (35-38%). Evaporated milk can also work (slightly less rich), or try condensed milk (but then reduce the sugar).
- Pumpkin Puree: Canned plain pumpkin is ideal. Homemade pumpkin purée works too. If using pumpkin pie filling, omit the spices.
- Sugar: Brown sugar adds depth, but white sugar also works.
- Pumpkin Spice: A blend of warm fall spices. If you don't have store-bought, you can make your own pumpkin spice blend to use in this recipe.
- Nutmeg: Another warm fall spice, with a strong flavour. A little goes a long way.
- Graham crumbs: Store-bought or homemade. Crushed digestive biscuits, vanilla wafers, or gingersnaps are great alternatives.
- Eggs: Essential for structure.
- Salt: I used sea salt. If using table salt, reduce slightly.
This recipe has not been tested with all possible substitutions or variations. Making changes may alter the taste, texture, or overall outcome. If you try a different ingredient, please share in the comments!
See the recipe card for the complete ingredient list and recipe instructions.

Smart Shortcuts:
Use a pre-made 9-inch graham cracker crust to skip the crust step entirely. You can also swap the pumpkin purée and spices for canned pumpkin pie filling to speed things up!
Flavour Variations
This recipe is delicious as-is, but you can easily customize it. Here are some variations I love:
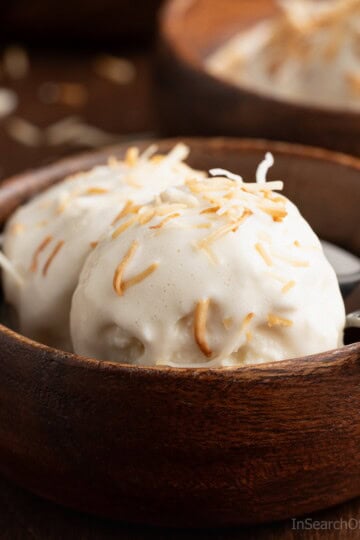
- Chocolate Pecan Topping: Drizzle with chocolate syrup and sprinkle with toasted pecans (see photo below).
- Maple Pecan Topping: Top with toasted pecans and a drizzle of maple syrup.
- Chocolate Graham Crust: Swap regular graham for chocolate ones or add ¼ cup cocoa powder.
You can also add cinnamon or ginger to the crust if you like.

Why I Make This Recipe
I used to make my pumpkin pies with store-bought pastry crust, but after a while, I wanted something with more flavour.
So I thought, what if I combined the filling from my pumpkin crepes with the graham cracker base from my pumpkin cookie bars?
The result is a creamy pumpkin pie recipe with a graham cracker crust that beats every other pumpkin pie I've ever made.
Scroll down for step-by-step photos showing how to press the crust and mix the filling. It's easier than you think!
How to Make the Graham Cracker Crust
This crust recipe could not be easier. You're just going to mix everything in a bowl, pour it into your pie dish, and press it down. That's it!

Combine 1 ½ cups of graham cracker crumbs with 2 tablespoons of brown sugar.

Add 4 ounces of melted salted butter.

Stir the mixture until it looks like wet sand.

Pour it into your pie dish and smooth it into an even layer.
Once you've added the graham cracker mixture to your pie dish, press it down to create the crust.

I like to use a clean mason jar for this, but a glass or measuring cup would also work here.
Avoid just using your hands, as that doesn't work as well (and you're likely to get the crust stuck to your hands).
Use even pressure to push down on the crumbs, making an even, flat layer across the bottom and up the sides.

Be sure to build up enough crust along the sides of the pie dish to create a thick crust. Otherwise, your pie will fall apart when you slice it.
Making the Pumpkin Pie Filling
This step is as easy as it gets. Add all of the filling ingredients to a large bowl and whisk until the mixture is silky smooth and evenly blended.

For the smoothest filling, bring the eggs, pumpkin puree, and cream to room temperature before mixing. They'll combine more easily and help the custard bake evenly.

Once mixed, pour the filling into the crust and give the pie plate a gentle tap on the counter to pop any air bubbles.
Bake the pie for 50 to 55 minutes, until the edges are set but the centre still has a soft wobble. As the pie cools, the filling will firm up into a perfectly creamy texture.
Baking Tips
- If the edges of the crust brown too quickly, wrap them loosely in aluminum foil to prevent burning while the filling finishes baking.
- Avoid overbaking because it can cause cracks in the filling. Don't worry if the pie cracks, though; it will still taste great!
How to Store
This pie is best enjoyed fresh, but it will keep at room temperature for up to 2 days if covered tightly with plastic wrap.
You can also store it in the fridge for up to 4 days, though the crust may become softer over time.
For slightly longer storage, pre-bake the crust for 10-12 minutes before adding the filling.
If topping with whipped cream, add it just before serving and refrigerate any leftovers right away.
Frequently Asked Questions
Yes! You can make the crust up to 2 days ahead and store it covered at room temperature. You can also bake the entire pie a day ahead and refrigerate it overnight.
No. We tested this recipe with and without putting the crust in the fridge and didn't find that it made a difference.
It depends. If you want your pie to last longer without the crust getting soggy, you can bake the pie for 10-12 minutes before adding the filling. You can skip the pre-bake step if you plan to eat the pie within a day or two. The Graham cracker crust will cook together with the pumpkin pie filling.
No. Regular milk is likely to curdle once baked due to its low fat content. Try evaporated milk instead, but note that the texture won't be as rich. Condensed milk can also be used, but you will need to use less as it's very sweet.
At room temperature, about 2 days covered. In the fridge, up to 4 days. However, the crust may become soggy over time.

I hope you enjoy making this pumpkin pie with a graham cracker crust for Thanksgiving, Friendsgiving, or any other cozy fall gathering.
If you're planning a full menu, don't miss my collection of easy Thanksgiving recipes for delicious appetizers, mains and side dishes to serve alongside this dessert.
If you enjoyed this pumpkin pie recipe, please leave a comment with a rating below. I'd love to hear from you!
Recipe Card

Pumpkin Pie in Graham Cracker Crust
Ingredients
Graham Cracker Crust
- 1 ½ cups graham cracker crumbs, (12 full sheets crushed)
- 2 tablespoons brown sugar, (or white sugar)
- 8 tablespoons salted butter, melted (4 ounces)
Pumpkin Pie Filling
- 2 cups pumpkin puree, (one 15 ounce can)
- ½ cup brown sugar, (or white sugar)
- 1 teaspoon pumpkin spice
- ⅛ teaspoon ground nutmeg, (a small pinch), optional
- ¼ teaspoon salt
- 1 teaspoon vanilla extract
- ½ cup 35% cream, (whipping cream or heavy cream)
- 2 large eggs, beatenlightly beaten
Equipment
- Standard 9-inch Pie Plate, (ceramic or glass)
Instructions
- Preheat the oven to 350°F (180°C).
Make the Graham Cracker Crust
- In a large bowl, combine the graham cracker crumbs, brown sugar, and melted butter. Stir until the mixture looks like wet sand.
- Pour it into a standard 9-inch pie plate and press firmly into an even layer across the bottom and up the sides using the bottom of a glass or measuring cup.
Make the Pumpkin Pie Filling
- In another bowl, whisk together the pumpkin puree, brown sugar, pumpkin spice, nutmeg, salt, vanilla, cream, and eggs until smooth and evenly combined.
Assemble and Bake
- Place the pie plate on a baking sheet. Pour the filling into the prepared crust and smooth the surface with a spatula.
- Bake for 45 to 55 minutes, until the edges are set and the centre still has a slight jiggle. If the crust edges brown too quickly, cover them loosely with foil.
Cool and Serve
- Let the pie cool completely at room temperature before slicing. It will continue to set as it cools.
Save This Recipe
Notes
- Pie plate size: Use a standard 9-inch pie plate about 1.5 inches deep. Avoid deep-dish plates, as the filling quantity will not be enough.
- Graham cracker crumbs: Pre-made crumbs are easiest, but you can make your own by crushing whole graham crackers in a food processor or zip-top bag. A store-bought graham cracker crust also works.
- Room-temperature ingredients: Bring the eggs, pumpkin puree, and cream to room temperature before mixing. They'll combine more easily.
- Pressing the crust: Use the bottom of a glass or mason jar to press the crumb mixture firmly into the pie plate. Avoid using your hands, which can cause sticking. Build the sides up well so the pie holds together when sliced.
- Prebaking (optional): No prebaking is needed if you plan to eat the pie within 1-2 days. For longer storage, bake the empty crust for 10-12 minutes before filling to reduce sogginess.
- Browning crust: If the crust edges brown too quickly, cover them with foil to prevent burning.
- Doneness test: The pie is ready when the edges are set but the centre still has a slight jiggle. It will firm up as it cools. Overbaking can cause cracks, but the pie will still taste great.
- Storage: Keep covered at room temperature for up to 2 days or refrigerate for up to 4 days. The crust may soften slightly over time.
- Serving suggestion: This pie tastes best slightly chilled or at room temperature with a dollop of whipped cream.
Please read the full blog post for all of my tips, variations, and recommendations for this recipe.
Nutrition
Nutritional information is an estimate provided as a courtesy and will vary based on the specific ingredients used. For exact values, use your preferred nutritional calculator with the products you're using.
Private Notes
Have you made this recipe?
Let us know how it turned out in the comments!About Shareba
Shareba Abdul is a recipe developer and food photographer with a Culinary Arts certificate from George Brown College and 15+ years of experience creating and testing recipes for home cooks. She is also a member of the International Association for Culinary Professionals. All recipes on this website are tested in her home kitchen. Learn more →


Leave a Comment: