

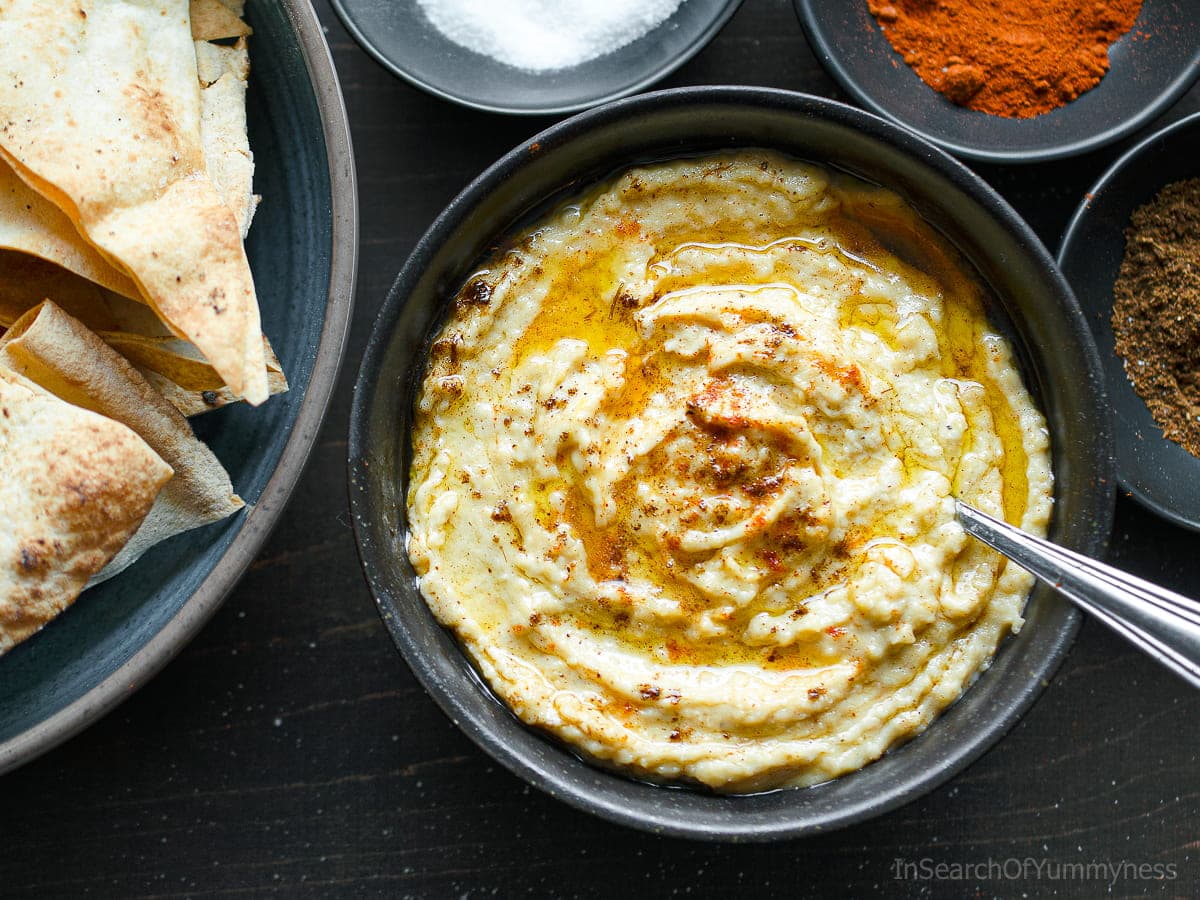
Hummus is one of those homemade snacks that's hard to stop eating. It's creamy, savoury, and satisfying, especially when it's made from scratch.
Learn how to make hummus and pita chips at home with just a handful of ingredients.
Recipe Highlights
- Servings: Makes 4
- Time Commitment: 10 minutes prep + 18 minutes cook time
- Effort Required: Easy, with one extra step (boiling chickpeas improves texture but can be skipped if short on time)
- Special Equipment: Food processor
- Ingredient Complexity: Pantry basics (chickpeas, tahini, lemon juice, garlic, olive oil, pita bread)
"This was fast preparation. I added roasted garlic and extra flavour. I used an immersion blender and it came out perfect." - Jeff
Jump to Section:
Hummus is a healthy and delicious dip made from chickpeas and tahini. While it's easy to find at most grocery stores, homemade hummus is infinitely more tasty and worth the effort to make.
I'm sharing how I like to make hummus, plus a tip I picked up from The Ayoubi Family during an episode of The Big Family Cooking Showdown for using ice to make your hummus fluffy.

Ingredients and Substitutions
- Chickpeas (a.k.a. garbanzo beans): You can use dried or canned chickpeas. Dried chickpeas make a smoother hummus. Jarred chickpeas from Spain or Portugal are also great if you want to make an extra special hummus for entertaining.
- Tahini: A smooth paste made from ground sesame seeds. Look for high-quality Middle Eastern tahini for the best flavour. Brands from Lebanon or Jordan, for example, are usually excellent. If you need a sesame-free option, you can use SunButter instead.
- Lemon juice: A key flavour in hummus. Do not substitute with lime.
- Garlic: I used one clove, but you can use two if they are small.
- Ice Cubes: The secret ingredient for making smooth, fluffy hummus. If you don't have any ice on hand, use very cold water.
This recipe has not been tested with all possible substitutions or variations. Making changes may alter the taste, texture, or overall outcome. If you try a different ingredient, please share in the comments!
See the recipe card for the complete ingredient list and recipe instructions.
Variations
- Roasted Red Pepper Hummus: For a slightly smoky, sweeter version, blend in one roasted red pepper (peeled and seeded) with the chickpeas, tahini, lemon juice and garlic. It adds beautiful colour and a subtle, sweet flavour.
- Roasted Garlic Hummus: Replace the raw garlic with 6-8 cloves of roasted garlic for a sweeter, milder hummus.
- Spicy Hummus: Blend everything, then add ¼ to ½ teaspoon of harissa paste for a spicy kick. Harissa can be intense, so add a little at a time until you reach your desired flavour.
How to Make Hummus
I've made several variations of hummus and chips over the years, and this hummus is the most delicious version I've made so far.
If you have time to boil the canned chickpeas, do it. The texture is so much smoother.
Prepare the Chickpeas
- If using dried chickpeas: Add chickpeas to a bowl with a ½ teaspoon of baking soda and cover with water. Soak for 8 hours (or overnight).
Then drain the chickpeas and add them to a pot with enough fresh water to cover them, along with another ½ teaspoon of baking soda. Bring to a boil and cook for 30 to 60 minutes, or until cooked through and very soft. Older chickpeas will take longer to cook.
Skim off any foam or skins that accumulate on the surface of the water. - If using canned or jarred chickpeas: Drain and rinse the chickpeas.
Then add them to a pot with enough water to cover them and a teaspoon of baking soda. Bring to a boil and cook for 5-8 minutes, or until very soft. Since canned chickpeas are already cooked, they don't need to boil as long as the dried chickpeas.
If you want to add salt, wait until the last 10 minutes of cooking. This will season the chickpeas (like salting pasta water), but adding it later helps prevent the skins from becoming tough.
The reason we're adding baking soda to the water is to help soften the chickpeas and loosen the skins. Skim off any that float to the top of the water, but don't worry about trying to remove all of them.

You can reserve the chickpea cooking water and use it as the base for soups or stews.
Want To Save This Recipe?
Putting the Hummus Together
- Add the cooked chickpeas to a food processor bowl while they are still warm but not hot.
- Add the tahini paste, some lemon juice, garlic, salt, and 2 ice cubes.
- Blend to combine, then taste the mixture. Add more tahini, lemon or salt if needed.
- Blend again until the texture is very smooth. If needed, stop and add a small amount of the cooking water to thin the hummus or add another ice cube to make it fluffier. Blend again.
- The texture should be a smooth paste, but not too runny. The hummus will thicken as it cools down.
Tips for Making the Best Hummus
- Don't overcook the chickpeas: The goal is to cook the chickpeas until they are soft and have no "bite" to them, but you don't want to cook them into mush, or they won't be as flavourful. (I know firsthand that mushy, waterlogged chickpeas result in a watery hummus.)
- Don't skip the ice cubes: They help whip air into the hummus, giving it a smooth, fluffy texture.
- Adjust the texture if needed: If your hummus is too thick, add a little cold water or another ice cube and blend again until it loosens up.
- Don't add too much water: If you want to add water to thin your hummus, I recommend using the cooking water to avoid diluting the flavour too much. Also, I wouldn't use more than 3 average-sized ice cubes, as too many could dilute your hummus.
- Adjust the flavour to your taste: Chickpeas can vary in flavour, so you may need to add more tahini, lemon juice, or salt depending on the batch.
- Store it properly: If you're not serving the hummus right away, store it in an airtight container in the fridge. If you transfer it to a serving bowl ahead of time, press plastic wrap or parchment directly on the surface to prevent a skin from forming.
What to Serve with Hummus
There are many ways to enjoy this delicious chickpea paste. It's great as a snack, appetizer, or part of a Middle Eastern mezze spread.
Here are some ideas:
- Enjoy as a healthy dip for fresh veggies like cucumber, carrots, or bell peppers
- Serve with soft, warm pita bread as a side for a meal
- Make a quick snack of hummus and chips with crunchy homemade pita chips. Pretzels, crackers and potato chips are fun options, too.
- Replace mayonnaise with hummus as a healthy spread in wraps or sandwiches.
I often pair my homemade hummus with pita bread and a Greek salad for a complete meal. It also makes a great base for a quick Mediterranean flatbread.
How to Make Pita Chips

To make crispy homemade pita chips, simply cut pita bread into triangles and brush both sides lightly with olive oil before sprinkling with salt.
Bake them on a sheet pan at 375°F for 8-10 minutes, flipping halfway through, until they're golden and crisp.
Allow them to cool completely before serving, as they'll continue to crisp up during the cooling process for the perfect crunch.
Frequently Asked Questions
You can! Freeze in small portions for up to 3 months. Thaw in the fridge and stir before serving. If your hummus has become too thick, stir in a small amount of cold water to loosen it up.
Canned chickpeas are usually cooked to an al dente texture, which isn't soft enough for smooth hummus. Boiling them softens the chickpeas and helps loosen the skins, making them easier to remove. This results in a creamier texture. That being said, if you don't have time to boil the chickpeas and don't mind a grittier texture, you can skip this step.
Yes! You can use a blender or an immersion blender to make hummus. Boiling the chickpeas will make it easier to combine them. Or, you can mash everything together with a potato masher!
Recipe Card

Hummus and Pita Chips
Want To Save This Recipe?
Ingredients
For the Hummus:
- 2 cups canned chickpeas, 1 (19 fl oz) can of chickpeas, drained and rinsed, or ¾ cup dried chickpeas (see note)
- .5 cup tahini
- 4 tablespoons lemon juice, (technically ¼ cup, but don't add it all at once)
- 1 clove garlic, minced
- .75 teaspoon salt
- 3 ice cubes
- olive oil, for serving (optional)
- paprika, or sumac, for serving (optional)
For the Pita Chips:
- 4 pita breads
- 4 teaspoon olive oil
- ¼ teaspoon salt, (add more if desired)
Equipment
- Food Processor
- Medium Pot
- Spider Strainer, or large spoon (to remove chickpea skins)
- Sheet Pan, (for pita chips)
Instructions
FOR THE HUMMUS:
Preparing the Chickpeas
- If using canned or jarred chickpeas: Drain and rinse well. Place in a pot with fresh water and ½ teaspoon of baking soda. Bring to a boil and cook for 5-8 minutes, or until very soft. Skim off any skins that accumulate on the surface of the water. Reserve the cooking liquid.
- If using dried chickpeas: Add chickpeas to a bowl with ½ teaspoon of baking soda and cover with water. Soak for 8 hours or overnight. Drain, then transfer to a pot with enough fresh water to cover and add another ½ teaspoon of baking soda. Bring to a boil and cook for 30 to 60 minutes, or until cooked through and very soft. Skim off any foam or skins that accumulate on the surface of the water. Reserve the cooking liquid.
Making the Hummus
- Add the warm chickpeas to a food processor bowl.
- Add tahini, 2 tablespoon of lemon juice, garlic, and salt to the chickpeas. Add two ice cubes and turn on the food processor.
- Blend until mostly smooth. Taste and adjust the lemon and salt until the hummus tastes lemony and well-seasoned.
- Blend again until the hummus is very smooth. If it's too thick, add a splash of the cooking water. For a fluffier texture, add another ice cube and blend again.
- The hummus should have a creamy, smooth texture. It will thicken a little more as it cools. Garnish with a drizzle of olive oil and a sprinkle of paprika (or sumac) if desired and serve slightly warm or at room temperature.
FOR THE PITA CHIPS:
- Cut each pita bread into 8 triangles, brush both sides lightly with olive oil, and sprinkle with a pinch of salt.
- Bake on a sheet pan at 375°F (190°C) for 8 to 10 minutes, flipping once, until golden and crisp.
- Let them cool before serving. They'll continue to crisp up a bit as they cool.
Notes
- Dried chickpeas need 8+ hours soaking, then 30-60 minutes cooking time
- Boiling canned chickpeas creates a creamier texture
- Ice cubes help create a smooth, fluffy texture - don't skip them!
- Adjust lemon juice, tahini, and salt to taste
- Add cooking water if too thick; hummus will firm up as it cools
- Store covered in the refrigerator for up to 3 days
- Day-old pita bread works best for even crisping
- Store in an airtight container for up to 3 days
Please read the full blog post for all of my tips, variations, and recommendations for this recipe.
Nutrition
Nutritional information is an estimate and will vary depending on specific ingredients and brands used. Accuracy cannot be guaranteed.
Private Notes
Have you made this recipe?
Let us know how it turned out in the comments!This recipe was published in July 2018 and has been updated to include new tips and clearer instructions in August 2025.


Ella says
My kid with sesame food allergies was about to also enjoy this amazing recipe with Sunbutter! We will soon try this with wow butter as well! Definitely a great dip for kids too! Thank you for sharing!
Shareba Abdul says
Thanks for sharing that the recipe worked with Sunbutter as a tahini substitute!
jeff says
This was fast preparation. I added roasted garlic and extra flavour. I used an immersion blender and it came out perfect
Shareba Abdul says
Thanks for sharing! It's good to know that the immersion blender worked out for you!
Ella says
Love how detail it is and love the tips too! We are allergic to sesame but we will try to make it with wow butter. Can’t wait to try making this! Feels like my kids will love it! And love that it’s packed with good healthy ingredients
Kristen says
I love a good hummus recipe.
Shareba says
😀
Ayngelina says
This looks so good it reminds me I need to pick up some tahini for when I go back to Cuba, they have lots of chickpeas but tahini really makes it.
Shareba says
Thanks! I'm on the hunt for a better brand of tahini to use at home. The one I bought is a bit bitter.