

Making homemade bread is easier than you think! This easy bread recipe makes 2 delicious loaves of fluffy white bread.

I've been meaning to share this easy bread recipe for years, but it always gets pushed down my to-do list in favour of more fun/colourful/exciting recipes. It's a great recipe for homemade bread, don't get me wrong, it's just that I haven't been motivated to photograph it or write about it because it's so basic.
But things have changed, haven't they?
Suddenly it feels like basic is what the world needs right now. A return to easy wholesome recipes that are comforting and uncomplicated.
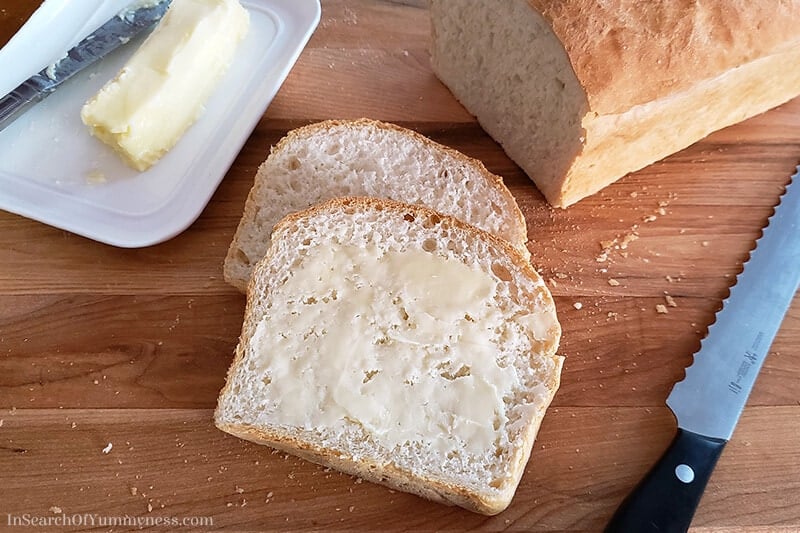
So I'm sharing my family recipe for basic white bread. It's fluffy, a little bit chewy, and is perfect for toast or sandwiches.
This is my mom's recipe that she's been making for 40+ years, and it's so much tastier than the white bread that you buy in a plastic bag at the grocery store.
I know someone is going to ask "can this be made with whole wheat flour", and the answer is "I don't know".
Sorry about that.
We did manage to get some whole wheat flour today, so I might ask my mom to try this with a mix of white and whole wheat flour, but she's not a fan whole wheat bread, so it's nothing something she's tried before.
Although I suspect if she made her own whole wheat bread from scratch, she'd probably like it...

Ingredients for this Easy Bread Recipe
You will need white all-purpose flour, active dry yeast, cow's milk, salted butter, sugar (for the yeast) and salt for this white bread recipe.
I know basic ingredients are hard to come by right now, but we managed to get butter from a 7-11 gas station (who knew?!), and flour from a local Indian grocery store.
Things are starting to come back to our big box grocery, but they are rationing items. Luckily, this recipe only uses a half cup of milk and 2 oz of butter, so if you're short on both of those items, you might still be able to make this recipe.

Important Tips for Baking Homemade Bread:
If you've never made homemade bread before, I know that the process can seem a bit daunting!
My mom has had a lot of practice, but I'm still very new to it myself. With that in mind, I've tried to write this blog post in a way that would be really helpful to someone who is new to baking.
Hopefully, these tips will help you be successful in baking this easy bread recipe.
How to Measure Flour:
The most accurate way to measure flour is by weight, with a digital kitchen scale. That being said, my mom has made with bread using measuring cups (or sometimes, just by sight using her hands to portion out the flour), and it has never turned out badly, so if you don't have a scale, don't panic.
We've included both sets of measurements in this recipe, you just have to click the dropdown bar in the ingredients list and change it from US Customary to Metric to see them.
If you're using measuring cups, you need to follow the "spoon-and-level" method to measure your flour.
Make sure your flour is loose with no clumps. If it's clumpy, gently rake it with a fork. Once it's loose, grab a large eating spoon and gently spoon the flour into your measuring cup. Once you fill-up the cup, use the back of a butter knife to level it off. Pour the measured flour into a bowl and repeat the process as needed.
Be very careful not to pack down the flour, or you'll end up with a dense, dry loaf of bread.
Want To Save This Recipe?
How to Use Active Dry Yeast:

Yeast is a living single-cell organism, as weird as that sounds. There are different kinds of yeast available including active dry yeast, instant yeast (bread machine yeast) and fresh yeast.
This recipe uses active dry yeast and you need to "feed" it with sugar so it can do its work in your loaf of bread. You need to dissolve either sugar or honey into lukewarm (not hot!) water, and then allow the yeast to sit until foamy before you add it to your flour.
If your water is too hot, the yeast won't get foamy. If you're sure the water was the right temperature, but it still didn't work, your yeast might be dead. Check to see if it might be old or expired.
How to Knead the Bread Dough:

Kneading is necessary to develop the gluten in the bread, which gives it strength and structure. You need to knead the dough long enough to make it smooth and elastic, but keep in mind that over-kneading can lead to a tough loaf of bread.
Honestly, kneading dough is something that I'm still relatively uncomfortable with. It's something that takes practice, and I just don't bake often enough to feel confident. My mom, however, has been kneading dough for bread and roti for years, so she has a system that works for her.

She prefers to knead her dough on our kitchen table instead of our kitchen countertop because it's lower and more comfortable for her since she's petite. If you're a tall person, your kitchen counter might be more comfortable so you're not hunched over. Adding a bit of flour to your work surface helps prevent the dough from sticking, but be careful not to use a ton of flour or your loaf may become dry.
In regards to the actual technique required for kneading dough, I can't figure out a way to explain it that makes sense... I'm a visual person, so I think it just makes more sense to show you how to do it. This video from King Arthur Flour on how to knead dough is really helpful.
Choosing a Loaf Pan:

For this recipe, my mom used two 9.25 x 5.25 x 2.75 dark non-stick loaf pans. If your pans are light in colour, or they're not non-stick, that's totally fine.
Lighter pans may take longer to cook, so while it only took 21 minutes for our loaves to bake, yours may take longer. If you're not sure if your bread is cooked, you may want to reference this article on how to tell when bread is done baking.
Pans that are not non-stick need to be greased properly, or you'll have a difficult time removing your cooked bread from the pan. My mom recommends greasing your pan even if you're using a non-stick pan, just to be safe.
How to Grease a Loaf Pan:
A well-greased pan will make your life a lot easier when it comes time to remove your loaf from the pan. If you're not using a non-stick pan, this step isn't optional. However, it's a good practice even if you are using a non-stick pan.
- Grease your pan using butter or flavourless oil. My mom likes to save the paper from sticks of butter so she can rub her pans down with it. I prefer to use melted butter, which I brush on with a pastry brush. You could use your fingers or a piece of paper towel if you don't have a brush. Be sure to coat the entire interior of the pan.
- Put a spoonful of flour into the pan, then turn the pan and tap the sides so the flour evenly coats the inside of the pan.
Regardless of what fat you use to grease your pan, be sure not to leave any puddles or lumps behind. You're aiming for a thin even coating of fat, and then a thin layer of flour on top of that.
This easy bread recipe is a great alternative to grocery brand white bread loaves. I love the fluffy and slightly chewy texture! This white loaf makes great toast (I like it with cheese or jam), and it has enough structure to make great sandwiches too.
We've found that the loaves usually last about a week when kept airtight. We usually wrap it in plastic wrap and then stick it in a large Ziploc bag (the bag isn't big enough to cover the whole loaf, usually).
If you're not going to finish 2 loaves in a week, or you want to keep the second loaf fresher while you enjoy the first one, you can stick one in the freezer. Not the fridge, because the fridge has a way of drying out bread. But you can wrap up a loaf in plastic, place that in a large freezer bag, and it should freeze really well for quite a while.
Whew! Sorry, I know this blog post is really long, but I'm hoping that you've found it useful. I've added step by step photos in the recipe below for people like me who are visual learners.
If you have any questions, leave them in the comments below and I'll do my best to respond to you.Also, if you're looking for more easy bread recipes you can check out our recipes for cheddar jalapeno cornbread and savoury lentil cornbread muffins with sauteed onions.
Happy Baking and Stay Safe ♥
Recipe Card

Easy Bread Recipe (White Bread)
Want To Save This Recipe?
Ingredients
- 1 tablespoon granulated sugar
- ½ cup water, lukewarm (for yeast)
- 2 tablespoon active dry yeast
- 6 cups all-purpose flour, plus 2-3 tablespoon extra for dusting your work surface (white flour)
- 1 ½ teaspoon salt
- ½ cup milk, warm
- 2 ounce salted butter, melted
- 1 ⅓ cup water, warm (for mixing dough)
Equipment
- Non-Stick Loaf Pan
- Measuring Cups
- Measuring Spoons
Instructions
- In a small bowl, add 1 tablespoon sugar to ½ cup of lukewarm water. Stir to dissolve. Sprinkle on yeast, stir, and let stand for about 10 minutes or until foamy. Stir well.
- Add flour to a large mixing bowl, add salt and mix with your hands to combine. Make a well in the middle, pour in yeast mixture, and start folding in the yeast with your fingers or a wooden spoon.
- When yeast is just incorporated, make another well in your flour mixture. Add warm milk and melted butter. Mix with your hands or a wooden spoon to combine.
- Gradually add 1 cup of warm water to the mixture, brining the dough together with your hands. Add the rest of the warm water as necessary, gathering all of the flour into the dough. You should have a soft dough that doesn't stick to the side of your bowl.
- Dust your work area with some of your extra flour. Turn out the dough onto the floured surface, and shape it into a ball. Knead the dough until it is smooth and elastic. This takes about 5-10 minutes.
- Lightly grease a bowl with butter, cooking spray, or a flavourless oil. Add dough to bowl and turn over to coat. Cover with plastic wrap or a damp tea towel.
- Place the dough in a warm place and let rise for about 45-60 minutes. The dough should become doubled in size.
- Punch down the dough to remove the air, then turn out onto your work floured work surface. Divide the dough into 2 equal portions. Need each portion for a couple of minutes and shape into a loaf.
- Place each loaf into its own greased 9.25 x 5.25 x 2.75 loaf pan. Cover with a tea towel and place in a warm place to rise again for 45-60 minutes. Once dough has risen to about 3cm above the top of the pan and has filled the pan completely, it's time to bake.
- Preheat oven to 425°F. Bake on the lower oven rack for 20-30 minutes*. Each loaf should be golden brown with a firm crust. Cool the loaves on wire racks.
Notes
Please read the full blog post for all of my tips, variations, and recommendations for this recipe.
Nutrition
Nutritional information is an estimate and will vary depending on specific ingredients and brands used. Accuracy cannot be guaranteed.


Kelly Neil says
Oh yum this bread looks perfect for sandwiches!! So soft and fluffy. Thanks for sharing!
Shareba says
Thanks Kelly!
Cynthia says
I like that your recipe doesn't use much milk! Love the step by step photo instructions!! I shall give your recipe a try!
Shareba says
Yes! It's handy that it only has a small amount of milk and butter, but they really make a difference in the texture of the bread. If you do give this a try, let me know how it turns out for you!
Joss says
This fluffy and chewy bread is exactly what I was looking for! It's a very good basic recipe.
Shareba says
Thanks so much Joss!
Colleen says
So much helpful bread making information here! Even though I have had to give up wheat, I still make bread for my family because they love it. I can't wait to try this perfect white loaf. It looks so good.
Shareba says
Thanks Colleen!