

These crispy potstickers are easy to make and have a tasty chicken, mushroom and cabbage filling.
These dumplings freeze really well - making them great for meal prep!

Let me begin by saying, if you have never wrapped a dumpling before, don't stress about how your dumplings look.
Of course fancy potstickers with lots of pleats are very pretty, but they require some technique and more than a little practice.
Luckily, a simple half-moon shaped dumpling tastes just as good!
Jump to Section:
🥣 Making the Filling
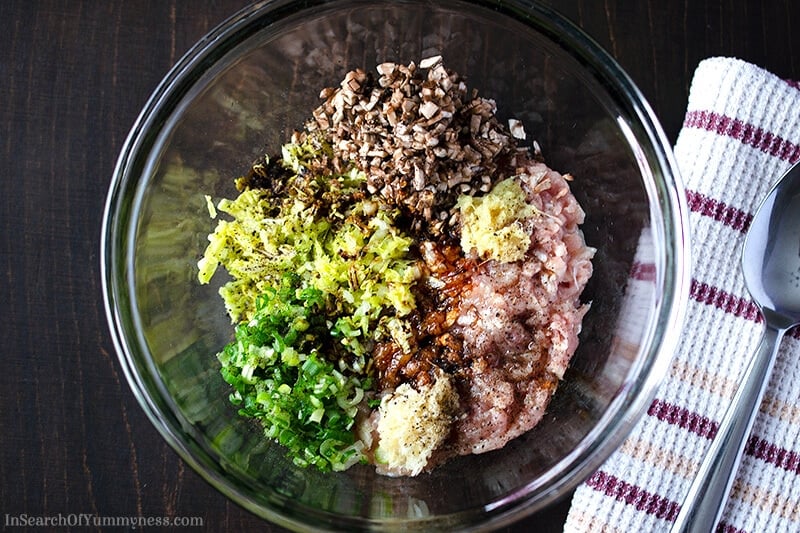
While there are quite a few ingredients in the filling, it's actually very easy to make
First, you need to sprinkle the Napa cabbage with salt and set it aside for about 20 minutes. This will pull the excess water from the cabbage, which you want to do before adding it to the filling.
Once you squeeze the excess moisture from the cabbage, you'll add it to a bowl with the rest of the ingredients.
I chose to use cremini mushrooms in this recipe because I like the flavour, but you could use white button mushrooms or shiitake mushrooms instead.
Or, if you're not a mushroom fan, you can omit them all together and still have a tasty dumpling.
I also used ground chicken in my filling, but of course, you could use ground pork here instead. If you do use pork, you will probably want to omit the oil that I added to the mixture, as it may become too greasy.
Once you've mixed the filling, it helps to set the bowl in the fridge for at least 30 minutes to chill. This makes it easier to handle when filling your dumpling wrappers.
Don't leave the mixture in the fridge for longer than 4 or 5 hours, though. The flavours tend to become muddled if the filling sits in the fridge for too long.
The chilling process can also help to keep the fat cold until it's cooked, which gives you a juicer dumpling.
Once your mixture is chilled, you can start wrapping!
🥟 Wrapping the Dumplings
Set up a wrapping station on a clean work surface in your kitchen.
Keep your dumpling wrappers nearby along with the large mixing bowl of filling. You'll want to work quickly so that your wrappers don't dry out!
I found this part really frustrating at first because I was being a perfectionist. If I can give you any advice, it would be to just relax and have fun with it.
Who cares what it looks like? No one is judging you on your folding skills.
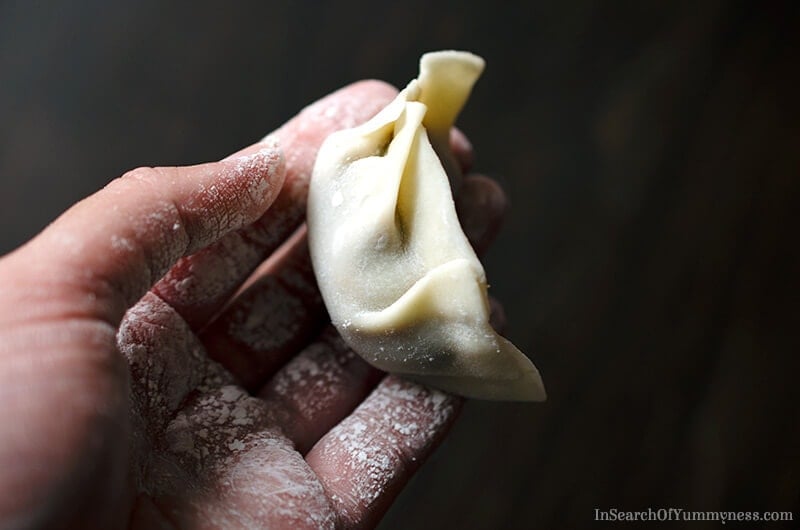
When is comes to wrapping your dumplings, the easiest fold you can do is a half-moon shape.
You literally just fold the round wrapper in half and press down the edges. It will look like a pierogi, and it will taste just fine.
If you're short on time or patience, this is the fold for you.

If you want to get a bit fancier, you can try adding a few pleats to your fold.
I followed a video on YouTube, and honestly it's the only reason I managed to make anything half-decent in the end. I could NOT get my head around the pleating until I watched Magic Ingredient's demonstration.
It's not in English, but I slowed the video down and was able to follow what she was doing.

Want To Save This Recipe?
If you're feeling really ambitious, or you already know how to wrap dumplings, then go all in and add lots of pleats!
My mom made the dumpling below, and it was so damn cute... yes, I was jealous of her skills. Have I mentioned that she's never done this before?
She watched Maggie from Omnivore's Cookbook wrap dumplings and picked up the technique very quickly.

As you wrap your dumplings, you'll want to put them in a single layer on a baking sheet lined with parchment paper. This will prevent them from sticking to the surface.
You'll also want to cover the shaped dumplings with a damp cloth or a piece of plastic wrap so they don't dry out.
It will take you a little while to wrap 30 dumplings on your own, and if you leave the wrapped ones open they will dry out significantly.
🥶 How to Freeze the Dumplings
If you're not going to cook the dumplings right away, you can freeze the raw dumplings for later.
Just put the whole tray in the freezer and wait until the dumplings are frozen solid. Then you can move them into a zip-top bag or a freezer-safe container and leave them in the freezer for up to 3 months.
You can cook the frozen dumplings without defrosting them (as defrosting tends to make the dumplings stick together).
🍳 Pan-frying the Dumplings

When it comes to actually cooking the dumplings, there are a few different ways to do it.
Some people prefer to boil the dumplings first, and then fry them. I didn't want to do that though because I'm lazy...
I opted for the method that requires you to add the dumplings to hot oil, then steam them in the same pan, and then crisp them up again.
If you've never cooked dumplings like this before, it probably sounds counterintuitive to make them crispy and then add water, but trust me this works!
You'll get a crispy bottom on your dumplings every time.
It will take a little while to fry all of the dumplings that you wrapped. Just take your time and carefully fry each batch in a large pan until the bottoms are golden brown.
I find that using a nonstick pan makes the frying process a bit easier.
I put my completed dumplings in a single layer on another baking sheet so that they don't stick together.
Avoid the temptation to hold the cooked dumplings in the oven while you fry the rest, though! I tried this, and the potstickers dried out horribly. You don't want to ruin all of your hard work!
Cooked pan-fried dumplings can stay in the fridge for a couple of days, but you'll need to re-fry them, or they won't be crispy.
TIP: If you run out of wrappers, the leftover filling can be rolled into meatballs and fried. These make tasty little treats when dipped into sweet chilli sauce.

🌡 Food Safety
A Note About Cooking Chicken: I always use a food thermometer when I'm cooking chicken, so I can avoid giving myself or my family salmonella poisoning.
Health Canada recommends cooking ground chicken to a temperature of 165°F or 74°C. Once you've hit that, you know your chicken is fully cooked and safe to eat.
Check the dumplings as soon as you take them out of the skillet, or they will cool down and you won't get an accurate reading.

Serve your cooked dumplings warm, with a dipping sauce of your choice.
I went with a classic soy sauce and chilli mixture (with some toasted sesame seeds for fun), but you could do soy sauce and Chinese black vinegar (another classic combo), or just plain soy sauce, or just eat them plain.
I garnished my plates with chopped green onion, but that's totally optional. If you don't like raw green onions, don't use them!
Want more dumplings in your life? Check out my recipe for fried shrimp wontons with mushrooms.
Recipe Card

Pan-Fried Dumplings (Potstickers)
Want To Save This Recipe?
Ingredients
Filling:
- 1.5 cup Napa cabbage, thinly sliced
- ½ teaspoon salt, for salting the cabbage
- ½ pound ground chicken, or pork
- 1 tablespoon oil, (peanut or vegetable)
- 3 cremini mushrooms, finely chopped (or shiitake mushrooms)
- 1 clove garlic, minced
- 1 green onion, finely chopped
- ½ teaspoon ginger, minced or grated
- 1 teaspoon dark soy sauce
- ½ teaspoon sesame oil
- ¼ teaspoon pepper
- ⅛ teaspoon salt
- pinch sugar
To Assemble & Cook:
- 1 package dumpling wrappers, round
- ¼ cup water, for steaming (you may not need all of it)
- 1 tablespoon oil, for frying (peanut or vegetable)
Dipping Sauce:
- 2 tablespoon dark soy sauce
- 1 teaspoon chili oil
- ¼ teaspoon sesame seeds, toasted
Instructions
Make the Filling:
- Sprinkle cabbage with salt, stir and set aside for 20 minutes. Squeeze excess liquid from the cabbage. Strain and discard liquid, then add cabbage to a large bowl.
- Add the rest of the filling ingredients to the bowl. Mix well to combine. Place mixture in fridge to chill.
Wrap the Dumplings:
- To assemble the dumplings, peel one wrapper off the stack and place in the palm of your non-dominate hand.
- Add about a ½ tablespoon of filling to the center of the dough. Use your finger to add a little water to the edge of the wrapper. By making the edges damp, it will stick together when you fold the dough.
- Fold the dough in half, and pleat as desired, making sure to press the edges together to create a tight seal.
- Use your fingers to slightly curve the dumpling, making sure the bottom is flat, so it can sit in the skillet.
- Place the wrapped dumplings pleat side up on a plate or tray lined with parchment, to prevent sticking. Cover with plastic wrap or a damp towel while you make the rest of the dumplings, so they don't dry out.
- Continue wrapping dumplings until you use all of the wrappers in the pack. Any leftover filling can be rolled into meatballs and fried.
Make the Dipping Sauce:
- Combine all ingredients in a small bowl, and set aside.
Pan-Fry the Dumplings:
- Heat oil in large nonstick frying pan over medium heat.
- Place 8-10 dumplings (depending on the size of your skillet) into the pan in a single layer, flat side down.
- Add ¼ cup water and cover.
- Cook for for 4-5 minutes, or until most of the water has evaporated.
- Remove lid. Add more oil if needed and fry for another minute or two, or until the bottom side of the dumplings is golden brown. Check for an internal temperature of 165F/74C to ensure that chicken is fully cooked.
- Remove cooked dumplings from pan. Repeat cooking process until all dumplings are fried. Serve warm with dipping sauce.
Notes
Please read the full blog post for all of my tips, variations, and recommendations for this recipe.
Nutrition
Nutritional information is an estimate and will vary depending on specific ingredients and brands used. Accuracy cannot be guaranteed.


Debbie says
Please advise people about adding the water to the hot peanut oil. We almost had a fire in our kitchen. May need to make that clearer to avoiding any problems.
Shareba says
Hi Debbie, I'm sorry to hear that happened. Can you give me more details? Did the oil splash out the pan onto your element? Are you using a gas stove? I'm just trying to figure out what might have gone wrong.
I've made the recipe several times at home, and there is usually a thin layer of oil left in the pan. When I add the water, it steams and splatters a bit but it's not enough to cause a kitchen fire. Also, I add the lid on right away to trap the steam. I am using an electric stove though. Please let me know what happened if you can, and I'll be sure to add notes to the recipe to avoid anyone else having an issue.
Arpita Patel says
Do exactly and it will be an awesome dumpling! Thanks for sharing a great recipe!
Shareba says
Thanks Arpita, I'm glad you enjoyed them!